
Beginners Guide to Using Postgres with Spring Boot
Introduction
- The goal of this article is to set up a Postgres database with sample data and then use Spring boot to connect with the database and serve data to the end user as the rest endpoint.
- Note that this article is beginner-friendly. All the codes have been made available on GitHub
- In future articles, I will use this setup to demonstrate some of the advanced databases, and JPA concepts ( associations, partitioning, sharding, transactions, etc) using the help of setup performed in this article.
Install Postgres
Install Postgres Database
- I have a mac environment so my commands are most suitable for mac. i believe there are equivalent tools to install on the respective environment like windows and Linux.
#install database
brew install postgresql

# start database
brew services start postgresql
Configure
- Once we started the service, we can log in to the default postgres database

- We need to configure Postgres with a role for our default postgres database.

- Now we can log in using a user that we created.

Install PGAdmin
- PGAdmin is a nice GUI tool that helps us to interact and operate over our postgres database server.
- I downloaded the package here for mac. but you can find appropriate for your environment.
- Once installation is done we can set up a connection to our database.
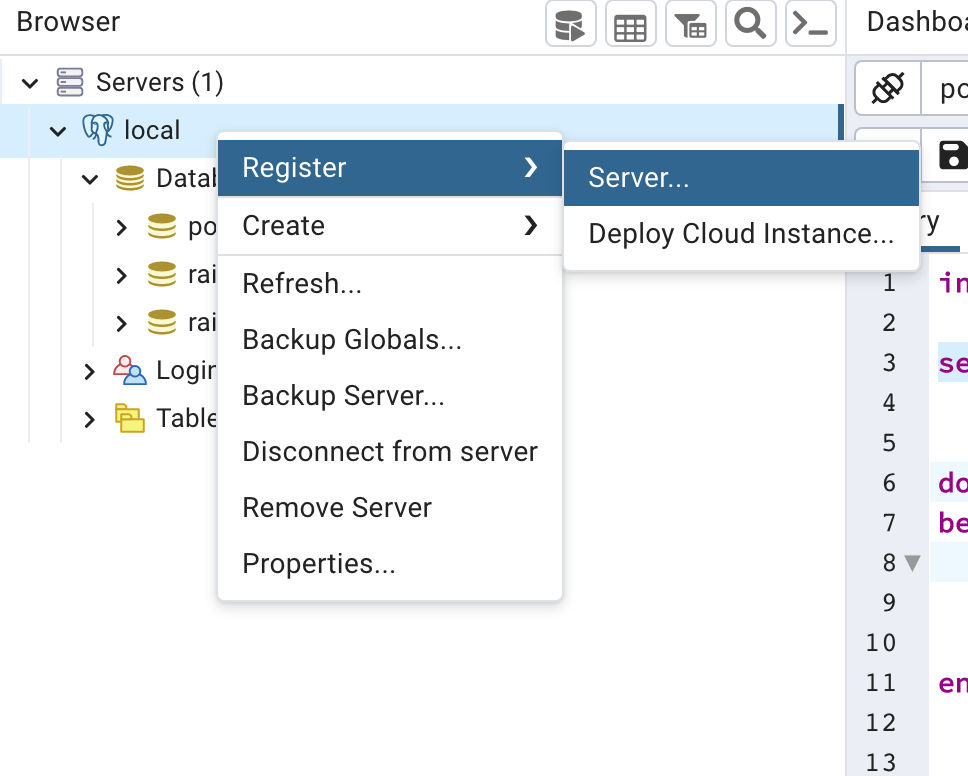
Setup connection string
- The bare minimum requirement is just a hostname, port, database, username, and password.
- on the local system, the hostname would be localhost. the default port is 5432 unless you have set a custom port. we are using the default postgres database and username/password we created above as admin/root

Setup Postgres Sample Data
Create Accounts Table
CREATE TABLE accounts (
 user_id serial PRIMARY KEY,
 username VARCHAR ( 50 ) UNIQUE NOT NULL,
 password VARCHAR ( 50 ) NOT NULL,
 email VARCHAR ( 255 ) UNIQUE NOT NULL,
 created_on TIMESTAMP NOT NULL,
        last_login TIMESTAMP
);
Insert Rows
- Simple insert row command would look like below
insert into accounts (username, password, email, created_on, last_login) values('user2', 'password1234', 'abc1@gmail.com', now(), now());
- But let’s add more rows to the table so that we have more data to play with
- We are using a loop to generate multiple rows.
do $$
begin
  for index in 3..10 loop
    insert into accounts (username, password, email, created_on, last_login) values( concat('user', index), 'password1234', concat('abc', index, '@gmail.com'), now(), now());
  end loop;
end ; $$
- Now let’s select the rows from the account table to verify if the inserts were successful
select * from accounts;

- Now our sample dataset is ready which we can connect with the application and build API on top of it and return as best response.
Operating Database with PSQL
- We can perform all the above operations using the command line as well.
Connecting to database

Listing all the databases

Switching database & Listing Tables

Describing the schema of the table

Selecting all the records from the table

Sprint Boot Project
- Goto start.spring.io and create the project name “spring-postgres”.
- I like maven as a build tool so I selected that but you can choose Gradle as well.
- I chose the java 17 version since that’s the latest I have on my machine.
- Add dependencies such as Spring web, Spring data jpa,

- Also, add postgres driver in order to connect to postgres database. the easiest way is to add the dependency in pom.xml
 <dependency>
   <groupId>org.postgresql</groupId>
   <artifactId>postgresql</artifactId>
   <scope>runtime</scope>
  </dependency>
Configure Database Connection
- I am using IntelliJ IDEA to open this project, you can use it with any idea that you are comfortable with (Eclipse, Netbeans, or even VSCode )
- The first thing that we have to do is to set up the database connection configuration in a resource file called applications.properties

spring.datasource.url=jdbc:postgresql://localhost:5432/postgres
spring.datasource.username=admin
spring.datasource.password=root
Write Application Code
Entity
- We will create an entity that will map the database table to Java Object.
@Entity
@Table(name="ACCOUNTS")
public class Account {
    @Id @GeneratedValue
    private int userId;
    private String username;
    private String password;
    private String email;
    private Date createdOn;
    private Date lastLogin;

//...... more code
Repository
- Next, we will create a repository interface, which will provide all the basic CRUD capabilities to execute against postgres database.
- It’s very simple using Spring data jpa, we just need to extend JpaRepository Interface and pass the Entity name and primary_key.
- Check out this file if you are interested.
package com.example.springpostgres.dao;

import com.example.springpostgres.entity.Account;
import org.springframework.data.jpa.repository.JpaRepository;

public interface AccountRepository extends JpaRepository<Account, Integer> {

}
Logic/Service
- Now, we will create a logic/service class. The job of this class is to house business logic if any.
- Our Logic class does not include any business logic, as of now just uses a repository object to query the database and return the result.
@Service
public class AccountLogic {

    @Autowired
    private AccountRepository accountRepository;

    public List<Account> getAccounts(){
        return accountRepository.findAll();
    }

}
Controller
- Now we are ready to create a controller that will handle user requests and return the appropriate responses.
- We will create AccountController, it has one get endpoint account that returns a list of accounts in postgres table.
@RestController
@RequestMapping("/accounts")
public class AccountController {

    @Autowired
    private AccountLogic accountLogic;

    @GetMapping()
    @ResponseBody()
    public List<Account> account(){
        return accountLogic.getAccounts();
    }
}
Execution
- We can execute the main method of SpringPostgresApplication class. The default port would 8080 and the endpoint that will be available to us would be http://localhost:8080/accounts
- You will see below message when application started successfully after running main method of SpringPostgresApplication.

- If you are using IntelliJ IDEA, you will see the terminal at the bottom tab and now we can use it to run the curl command.

Output
- Curl command returns a list of all the accounts

we can also see the result in the browser

Write First Custom Query
- In this section, we will see how we can write custom queries in spring boot.
- We can use @Query provided by spring data jpa to execute the JPA query. The below example is just returning userId greater or equal to the passed integer value.
- We will take this integer from the user as a rest request and pass it as an argument to this query method.
public interface AccountRepository extends JpaRepository<Account, Integer> {

    @Query("select a from Account a where a.userId >= :userId")
    List<Account> findAllWithFilteredUserId(
            @Param("userId") Integer userId);
}
Logic
public List<Account> getConditionalAccount(Integer userId){
        return accountRepository.findAllWithFilteredUserId(userId);
    }
Controller
- For the controller in request we are passing the userId param which is an integer and filter endpoint basically listening to the request.
    @GetMapping("/filter")
    @ResponseBody()
    public List<Account> accountWithCondition(@RequestParam Integer userId){
        return accountLogic.getConditionalAccount(userId);
    }
Curl Request
- For the curl request, I am passing userId as the path parameter and we can see that we are only seeing the result where userid is 5 or more

Code Repository
- As usual, I added a code repository to the github.
Conclusion
- In this article, we set up the Postgres database and serve the data using spring boot rest API.
- We also learn how to write custom SQL queries to fetch the data from the Postgres database.
- In future articles, we will use this setup to learn about some advanced concepts like ( associations, partitioning, sharding, transactions, etc)
If you want to learn spring boot 3 and spring boot 6, please check out this best seller and highest rated course. [ 38 hrs content, 4.7/5 stars, 6+ students already enrolled]